Linux, Deluge, Subliminal, Thunar and some nice subtitle tricks

I have this nice home server running Lubuntu 13.10, and it does a nice job managing downloads (Deluge + WebUI + TransDroid), serving files (Samba + Network Places), streaming analog TV (TVHeadend + TVHGuide), backing up my files and projects (BitTorrentSync), and handling all print jobs (CUPS + Let’s Print Droid) and some other tasks.

The only “discomfort” left were the Dutch subtitles for our movies and series. Before watching I had to go to my PC, log in to bierdopje.com or a similar site, search for the correct version and store it next to the .mkv on my network disk. No more!

I found out about a project especially for grabbing subtitles: Subliminal (previously Periscope).
Installation went wrong a couple of times, but once it worked it worked great. I’m not going to copy-paste the installation manual, you can find that here or here.

What I will post is what I did once Subliminal was installed. First of all, I wanted Deluge to get subtitles for every episode or movie once it was completed. Secondly, I wanted to be able to get a subtitle for videos that were already downloaded.

Subliminal Syntax

Once installed correctly, you can ask Subliminal to search for a subtitle with the following command:

subliminal -l en -- The.Big.Bang.Theory.S05E18.HDTV.x264-LOL.mp4

or in my case, Dutch:

subliminal -l nl -- The.Big.Bang.Theory.S05E18.HDTV.x264-LOL.mp4

Deluge Execute

The “Execute” plugin allows you to execute a command or script when a torrent is completed.
Deluge sends 3 parameters to you command or script: 1) the hash 2) the file name 3) the folder.
That’s cool, because subliminal needs the file name, and the folder name.

So I wrote a tiny little script to let the two communicate, and saved it as /home/server/getsubs.sh


#!/bin/bash
torrentid=$1
torrentname=$2
torrentpath=$3

cd $torrentpath
subliminal -l nl -- $torrentname

It’s a really simple script: go into the directory where the video is stored, and ask subliminal for a Dutch subtitle.

Made it executable: sudo chmod u+x /home/server/getsubs.sh

And told Deluge to run this script when a download is completed:

After enabling this plugin Deluge may require restarted for it to work properly.

I did, and it did! For every (most) movies and series a Dutch subtitle now magically appears next to the video file!

Thunar File Manager

Now the part where you can get a subtitle for previously downloaded videos. The subliminal script is in place, so now let’s find out how we can use this in Thunar.
Thunar allows you to make “custom commands”, and that is what we’ll do.

From the Thunar menu, choose “Edit” -> “Configure custom actions”
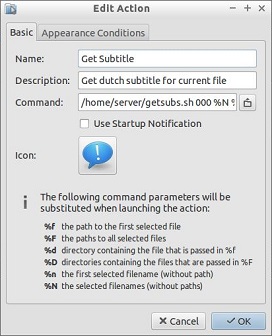
Click + (add a custom action) and fill it out like this:

The “command” line is: /home/server/getsubs.sh 000 %N %f (%N is the filename, %f is the folder)

Then on the second tab we fill in when this custom menu will appear:

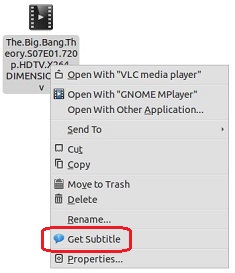
And the end result is a quick right-click “Get Dutch subtitle” menu that instantly gets the best subtitle:

Linux: howto avoid video devices getting mixed up after reboot, using udev rules

This is part of my tutorial “How to stream analog tv to mobile android devices with Ubuntu, MythTV, xmltv and MythFrontEnd“.

In Linux video devices can be accessed through “/dev/video0”, “/dev/video1” and so on. The problem is that the device designations can change after a reboot, but there is a way to “fix” your video devices. You can do this by making “symbolic links” to your devices, based on device name, driver or any other unique identifier. You can then use this symbolic link instead of “/dev/video0” and your device order will hold up after every reboot. Since I also install ZoneMinder with 3 webcams, this step is a must for me.

This is a synopsis from the MythTV guide I followed:

– make sure your devices are connected and can be accessed as “/dev/video0“, “/dev/video1” and so on.

– in a terminal, type:
udevadm info -a -p $(udevadm info -q path -n /dev/video0)
– copy/paste the output to a text editor and save it

– now for device #2, #3 type:
udevadm info -a -p $(udevadm info -q path -n /dev/video1),
udevadm info -a -p $(udevadm info -q path -n /dev/video2)
and so on.

– copy/paste each output to a text editor and save it for later. Repeat this step for all your video devices.

The output will look something like this:

looking at device '/devices/pci0000:00/0000:00:1d.7/usb1/1-3/1-3:1.0/video4linux/video0':
KERNEL=="video0"
SUBSYSTEM=="video4linux"
DRIVER==""
ATTR{name}=="Vimicro USB 2.0 PC Camera (Venu"
ATTR{index}=="0"

looking at parent device '/devices/pci0000:00/0000:00:1d.7/usb1/1-3/1-3:1.0':
...

Now look for something that you can use to uniquely identify your video device.
In my case I used:
for “/dev/video0”: ATTR{name}=="Vimicro USB 2.0 PC Camera (Venu",
for “/dev/video1”: ATTR{name}=="UVC Camera (046d:0805)",
for “/dev/video2”: ATTR{name}=="DC10plus[0]" and
for “/dev/video3”: ATTR{name}=="ivtv0 encoder MPG",
because they contain the names of the devices and they are unique.

Ok, now we have our unique identifying attributes, now it’s time to make symbolic links using “udev“:

– in a terminal type:

sudo gedit /etc/udev/rules.d/99-server.rules

This will create a new file where we will define our rules.
Use a high number (99 in this case) to start the filename with, this will make sure udev overrides automatic settings. You can choose your own filename, just make it start with a high number.

– Now we define one rule per video device. On each boot udev will read these rules, and create a symbolic link for the device found based on this identifier.

– Here’s the contents of my /etc/udev/rules.d/99-server.rules:


KERNEL=="video[0-9]*", DRIVERS=="zr36067", SYMLINK+="video-DC10"
KERNEL=="video[0-9]*", ATTR{name}=="ivtv0 encoder MPG", SYMLINK+="video-PVR-150"
KERNEL=="video[0-9]*", ATTR{name}=="UVC Camera (046d:0805)", SYMLINK+="video-Logitech300"
KERNEL=="video[0-9]*", ATTR{name}=="Vimicro USB 2.0 PC Camera*", SYMLINK+="video-Vimicro"

Make sure you have 1 rule per line, and no empty lines. It could look different in the browser, but there’s 1 rule per line.

What these rules tell udev:

look for any video device between 0 and 9 that matches DRIVERS==”zr36067″, and create a link called “video-DC10“.
look for any video device between 0 and 9 that matches ATTR{name}==”ivtv0 encoder MPG”, and create a link called “video-PVR-150” and so on.

Reboot the system to see if the links are there. The easy way to check is to open the Thunar file manager, and browse to “/dev”:

Symbolic links created with udev rules

From now on you can use these fixed links and your video devices will no longer be mixed up!

Linux – How to stream analog tv to mobile android devices with Ubuntu, MythTV, xmltv and MythFrontEnd

Note: It’s not that I watch much television, because it’s bad programming. I just want to be able to. Nobody asks the mountain climber “what are you doing up there?”

I’ve been looking for a way to watch analog TV on mobile devices for some time. A couple of things I tried were not satisfactory, mainly because my goal was to have my good ol’ Pentium IV torrent server do the work. Orb seemed like a good solution, but it required my main computer to be powered on since a Pentium IV is just not good enough for real-time transcoding etc. I also found Orb unstable, with lots of different versions. The last couple of versions did either not detect any of my 5 tv cards, or found no channels.

I heard of MythTV before, had experimented a bit with it a couple of years ago, and thought I’d give it another go.
I quickly found out there is a “pre-installed” Ubuntu version called MythBuntu.
Since I’m reasonably experienced with Ubuntu, I chose to go with MythBuntu 12.04.1.

I noticed that there are lots of tutorials out there, but they all cover only part of the process, and some are outdated. Here’s how I did it.

Hardware

The hardware I’m using is quite old. It’s a 2.4Ghz Pentium IV with 1GB RAM, a 80Gb boot disk, 500Gb media storage and a WinTV PVR-150. The main advantage of this card is that it hardware-encodes to MPEG-2, thus reducing the load on the poor CPU. If I can get this to stream unaltered… then there will be virtually no system load.

Keep in mind that I’m in the Netherlands, so channels and Program Guide is based on that country.

Installation

I installed MythBuntu using Universal USB Installer. I did rename “mythbuntu-12.04.1-desktop-i386.iso” to “mythbuntu-12.04-desktop-i386.iso” so the Installer could see the installation ISO. Installation is very straight-forward, and for this howto I assume you have installed Linux (or Ubuntu) before. A 2GB swap partition, and the rest mounted as /. The 500Gb media storage disk is mounted under /MEDIA. I installed SAMBA services so I could access the files from my home network.

Avoid multiple video devices getting mixed up

Note: if you have only 1 video device, you can skip this step completely and go to “MythTV Configuration”

Because this part of the tutorial is quite lengthy, I have moved it to a page of its own.


MythTV Configuration

Using MythBuntu makes installation a lot easier, because almost everything you need is included in the installation.

Time to setup the MythTV Backend with my PVR-150:

– start MythTV Backend Setup from the menu

– go to “General” and set your TV-format and channel frequency table. In my case since I’m in Holland PAL-BG, europe-west, timezone +0100. Press “enter” until you’re back in the main menu.

– go to “Capture Cards
– choose “New capture card”, and select “MPEG-2 encoder card” for the PVR-150.
– in the “video device” field, type “/dev/video-PVR-150” or the link name you have created with udev rules. Do NOT use “/dev/video0” or else you risk getting mixed up video devices after reboot. When you have typed in the name of your video device, the name should become visible behind “probed info”. In my case it says “Hauppauge WinTV PVR-150 [ivtv]” so I know I’m doing ok.
– press “Finish”

– now go back to the main menu and choose “Video Sources” then “New video source”.
– In the “Video source name” type “WinTV” or any name that you’d like to choose for your device. Leave the Listings grabber to “none” for now. Press “Finish”.

– now from the main menu choose “Input connections“.
You will now see a list of available inputs, followed by “-> (None)”. Note that the names should match the udev links you have created.
– now look for your tuner, in my case “[ MPEG : /dev/video-PVR-150 ] (Tuner 1)” and select it.

– now we will connect this tuner input to a video source:

Capture device: [ MPEG : /dev/video-PVR-150 ]
Display name: WinTV
Video source: WinTV
(or however you named your source in the previous step)

– Press “Next”, “Finish”, do not scan for channels. Maybe it will work for you, but my howto is based on the PVR-150, and MythTV will NOT find any channels on that card.

– Exit the MythTV Backend Setup, your root password will be asked to restart the backend, and choose “yes” if asked to run “mythfilldatabase”.

It seems nice to add channels manually, but I found out that the “xmltv program guide” system can do this for you.

Program Guide

This part is specific for the Netherlands, but it might work similar in your country.
I used the howto from tvgrabnlpy

– Download the latest version and rename to “tv_grab_nl_py”
– Backup your existing grabber:
sudo mv /usr/bin/tv_grab_nl /usr/bin/tv_grab_nl.backup
– move the grabber you downloaded to “/usr/bin”
(use thunar as root, or type sudo mv ./tv_grab_nl_py /usr/bin/tv_grab_nl)
– make the grabber executable: chmod ugo+x /usr/bin/tv_grab_nl_py
– get the program list by executing the script: tv_grab_nl_py
– now the channel list is put in “${HOME}/.xmltv/tv_grab_nl_py.conf
– edit this file and remove all the channels that you do not need (or you know you can’t receive). You can also put a # in front of a channel name you do not want.

Ok, now it’s time to tell MythTV that we have a listings grabber. Open the MythTV Backend Setup again, and go to “Video Sources“.
– Select “WinTV” (or the card you have set up) and change the listing grabber to “The Netherlands (tv_grab_nl_py version xxx)
– Press “Finish” and exit the Backend Setup.

– look up your local analog tv frequencies and have them ready. Here is an example of a dutch frequency table:
Example of a frequency table

NOTE: the frequency table might be in Hz or KHz, but if the table says “175,250” you should enter “175250” in MythTV Backend Setup.

– now in a terminal type:
sudo tv_grab_nl_py --config-file /home/yourname/.xmltv/tv_grab_nl_py.conf --days 3 --slowdays 1 --output /var/tmp/tvgrabnl/list.xml (where “yourname” should of course be replaced by your own username)
Note: this might take a long time to complete!
– and then send the data to MythTV:
sudo mythfilldatabase --file --sourceid 1 --xmlfile /var/tmp/tvgrabnl/list.xml --manual
This fetches the Program Guide for three days, and one day detailed information. Here’s the fun part: by using the “–manual” parameter, you will be asked to fill in the details for all missing channels. So have your frequency table ready.


Auto-updating the Program Guide

In order to auto-update the program listings every night, we make a script.

– in the terminal, type gedit ./update-epg.sh This will create an empty script. This should be the contents:


#!/bin/sh

basename=`date '+%A%Hh'`
mkdir -p "/var/tmp/tvgrabnl"
mkdir -p "/var/log/tvgrabnl"
xmlfile="/var/tmp/tvgrabnl/$basename.xml"
logfile="/var/log/tvgrabnl/$basename.log"
conffile="/home/server/.xmltv/tv_grab_nl_py.conf"

tv_grab_nl_py --config-file $conffile --days 3 --slowdays 1 --output $xmlfile --cache tvgrab.cache 2> $logfile

# Import into mythTV
export QTDIR=/usr/lib/qt3
mythfilldatabase --update --file --sourceid 1 --xmlfile $xmlfile

– make the script executable by typing chmod ugo+x ./update-epg.sh
– test the script by typing sudo ./update-epg.sh
– now make a cron job for this script and run it every night around 04:30.

You can also get the script here.

Note: the tutorials I found on the internet were outdated, the syntax for tv_grab_nl_py has been changed recently.

Mobile Device

There are two things to set up: 1) the web-based program guide & MythWeb and 2) some app to watch live TV with

The first is simple: just type in the IP-address of your MythBuntu server in your mobile browser.
If everything worked out, you’ll see something like this:

I have two Android-based devices, I have no experience on Apple products (sue me).
For Android there is a great little appcalled “MythFronTend“. Thanks to the maker(s) for keeping it free of charge. Support them if you can.

The setup of MythFrontEnd is very straight-forward:

Host = the ip address of your MythBuntu server
Port = leave standard
MySQL server = the ip address of your MythBuntu server
Port, DBName, Username = leave standard
MySQL password = you can find this in the MythFrontEnd on your MythBuntu server, under “Setup” => “General”
SSH tunnel => on
SSH tunneling host = the ip address of your MythBuntu server
SSH Port = leave standard
Username = your MythBuntu username
Password = your MythBuntu password


The result

And if you did this correct.. and all of the above… you can now watch, record, pause and playback HQ analog TV streamed to your Android device:

The best part is: because the PVR-150 is a hardware MPEG-2 encoding card, and my Tab and phone support this format, there is almost NO CPU usage anywhere along the line.
The MythBuntu server runs at an easy 5-10% CPU while streaming at 720×576 pixels!

Carrier IQ – the ultimate keylogger on YOUR smartphone

This baby logs your every keystroke, reads your tex messages before you’ve even read them, has access to bluetooth, your microphone and camera.
Best of all, the only way to remove it is by “rooting” your phone, and that will void your warrantee.

CarrierIQ has been seen on Android phones, iOS/Apple/IPhones, HTC, Samsung, Nokia, BlackBerry and many more.

For the Dutch folks: http://tweakers.net/nieuws/76517/htc-voegt-spionage-tool-toe-aan.html and http://www.iphoneclub.nl/154467/ook-sporen-van-carrier-iq-gevonden-in-ios/

For the Apple folks: http://www.geek.com/articles/mobile/how-much-of-your-phone-is-yours-20111115/

And the discoverer’s site: http://androidsecuritytest.com/

How to install uTorrent Server with WebUI on Ubuntu without Wine

Over the years I’ve tried several torrent clients on my Ubuntu server.
Since it’s an old 1Ghz P4 work horse, I prefer to run things “headless”.

The username used here is “yourname”, replace that with your own user name.
You also might want to check on the utorrent website for an updated version first.

Step 1 – get the uTorrent archive and unpack


$ cd /home/yourname/
$ wget http://download.utorrent.com/linux/utorrent-server-3.0-ubuntu-10.10-27079.tar.gz
$ tar xzf utorrent-server-3.0-ubuntu-10.10-27079.tar.gz

There may be a newer version available since I wrote this guide, please check the utorrent website for this.

Check the unpacked directory with the “ls” command, there should be a folder called “utorrent-server-v3_0”.

Step 2 – create a startup script

The script below is the startup script you need to run utserver automatically on startup.
Credit for the script goes to simonbcn.

Get the script here, and save it as /etc/init.d/utserver

Don’t forget to modify the CHDIR and NAME values in the script!

In our case, the CHDIR would be “/home/yourname/utorrent-server-v3_0” and the USER would be “yourname”

Step 3 – run the script on startup

Make it executable:


$ sudo chmod +x /etc/init.d/utserver

Tell your system to run this script on startup:


$ sudo update-rc.d utserver defaults

Try running the executable before you reboot, if you get an error message “libssl.so.0.9.8: cannot open shared object file: No such file or directory” then type in the terminal:


sudo apt-get install libssl0.9.8

Now reboot your system to check if this works.
If all went well, you can access the WebGUI on http://yourserverip:8080/gui from inside your LAN.

The default username/password is admin/(blank)

Step 4 – configure uTorrent

Now next thing to do, is setup the uTorrent Sever in the Preferences window:

You will probably want to set a name, password and your own listening port for the WebGUI.
When you’re done, visit the new page and log in (in my case http://yourserverip:12090/gui).
Then configure the uTorrent Server to your liking!

Make sure your download directories are writable, most common errors have to do with file permissions!